

How To Change Spark Plugs On 2013 Honda Civic Si
Honda Civic Spark Plugs Replacement Guide
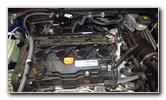
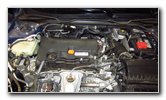
How to change the spark plugs in the Earth Dreams 2.0L I4 engine in a 10th generation 2016 to 2019 Honda Borough.
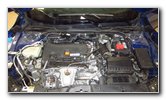
2016 Borough 2.0L I4 Engine
Globe Dreams K20C2

Loosen Counterclockwise
Owners of other Honda or Acura vehicles such as the Accord, Insight, Clarity, Fit, Hr-Five, CR-5, Pilot, Passport, Odyssey, Ridgeline, ILX, MDX, RDX, NSX, RLX and TLX may also find these DIY instructions to be helpful.
The OEM spark plugs in this 2016 Civic 2.0L I4 were the iridium tipped NGK DILKAR7H11GS (96964).
(The genuine Honda / Acura part number for the NGK plugs is Honda 12290-RDF-A01.)
A few other uniform replacement aftermarket spark plugs with their part numbers include the post-obit: Autolite XP5682, Champion 9412, Denso 4712 and NGK DILKAR7G11GS (91578).
The tools and other items needed to complete this procedure include a 10mm socket with a 1/iv" drive ratchet, a ix/16" spark plug socket, an extension bar, a 3/eight" drive ratchet and a tube of dielectric grease.
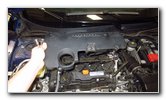
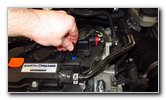
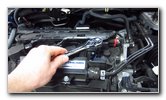
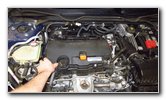
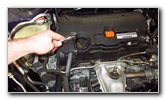
The first steps are to open the hood and then locate the four black metal bolts on the plastic engine cover.
Loosen 2nd Commodities
Remove third Bolt
Remove Fourth Bolt
At that place is one bolt well-nigh each of the 4 corners of the plastic encompass.
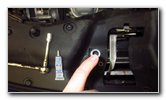
Close Up Of Bolt
Lift Off Plastic Comprehend
Prepare Aside Four Bolts
Prepare the embrace aside in a safe identify forth with the four black metal bolts.
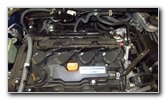
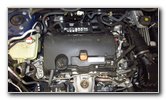
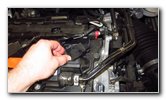
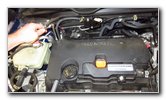
Peak of Engine Exposed
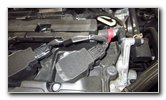
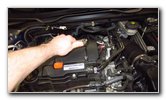
Ignition Ringlet Housing

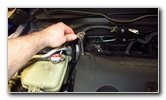
Button In Release Tab
If you have access to compressed air or a wet/dry vacuum, clean off the peak of the engine to assist reduce the take chances of having sand, clay or other debris fall downwardly into the spark plug well.
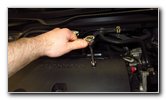
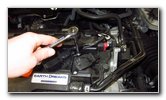
Push button in the release tab on on the electric connector earlier sliding it direct off the base of the ignition ringlet housing.
I recommend only checking or changing one spark plug at a time to assistance further reduce the risk of having a strange object fall down into the cylinder.

Pull Off Ability Plug
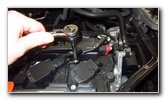
Loosen Counterclockwise

Single Bolt Removed
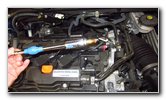
I found it easiest to attach a brusque extension bar to my socket and ratchet to get some clearance higher up the ignition curl.
Once the bolt is loose, spin information technology out the rest of the fashion by hand to assist prevent from having autumn down into the engine bay and perhaps get lost.
Set the bolt aside in a safe place.

Rotate Back & Along
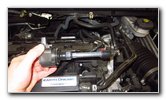
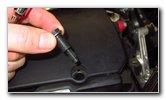
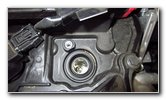
Lift Out Ignition Coil
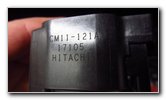
CM11-121A 17105
Elevator the ignition gyre straight out of the spark plug well and set it aside in a prophylactic place.
The OEM ignition coil part number was Hitachi CM11-121A 17105 which is Honda part number 30520-5R0-013.
If your Borough has been displaying a CEL / SES (cheque engine calorie-free / service engine soon) warning on the estimate cluster, you can check the issue with an OBDII Scanner (besides known equally an OBD two scan tool).
If the DTC (diagnostic trouble code) is related to the ignition coils such as P0350, P0351, P0352, P0353 or P0354, you may demand to supplant a declining or faulty ignition coil module. (You lot could also try checking and cleaning the electrical connector.)
A few compatible replacement aftermarket ignition coils with their office numbers include the following: Delphi GN10734, Standard Motor Products UF749 and Spectra Premium C-970.
Spark Plug Well

Spark Plug Socket

Loosen Counterclockwise
I like to utilise some painter's record to secure the socket to the extension bar to help prevent information technology from popping off and beingness stuck down in the spark plug well.
Lower the socket into the well and push it on to the top of the sometime spark plug.
Loosen the one-time spark plug by turning it in the counterclockwise direction.
If yous have trouble loosening the onetime spark plug, try spraying a pocket-sized amount of penetrating oil such as Liquid Wrench, Atomic number 82 Blaster or fifty-fifty WD-40 down into the well.
Let the penetrating oil to work downwards into the threads for at least 5 to 10 minutes.
Endeavour to avoid using excessive strength, the old spark plug should break complimentary relatively easily.
If you lot alive in a very common cold climate or shut to corrosive salt water, you could try warming up the engine or assuasive the penetrating oil to seep in for an hour or two.
Exercise not apply an excessive amount of penetrating oil. Just a short 1/two second spray (a few drops) is plenty for each spark plug well.
Spin Out Counterclockwise
Lift Out Onetime Spark Plug
Inspect Sometime Spark Plug
Spin out the onetime spark plug the rest of the way by hand.
Lift the old plug out of the well and remove it from the socket.
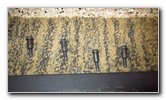
Inspect both ends of the old spark plug.
If the erstwhile plug is covered in oil, soot or blackness pulverisation, the engine might be burning oil and should exist checked by a professional mechanic.
On the other manus, if the old plug is covered in white powder and appears discolored, the engine may accept been subjected to over heating and you lot should take the cooling arrangement checked.
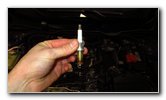
The OEM (original equipment manufacturer) spark plugs in this 2016 Civic were the NGK DILKAR7H11GS Laser Iridium which should exist pre-gapped from the factory to 0.044".

Lower In New Spark Plug
Tighten Clockwise

New Spark Plug Installed
If you have a spark plug gap guess, double check the gap on the new spark plugs.
Push the new spark plug into the socket.
Your socket should accept a rubber insert or a magnet in it to deeply agree the new plug into identify.
Carefully lower the new spark plug down into the well.
Try to avoid hitting the electrode tip against the pinnacle of the engine or the walls of the spark plug well.
Spin in the new spark plug by mitt by just using the extension bar. Do not attach the ratchet at this point.
Go along spinning the spark plug in the clockwise direction until it is finger tight with just the extension bar.
Then adhere the 3/8" drive ratchet and tighten the new plug.
If you are installing a new spark plug, tighten it to merely a fraction of a plough past the point when y'all feel the new vanquish washer collapse.
If y'all are re-installing the onetime spark plug, tighten it to a fraction of a turn past finger tight.
Endeavour to avoid over tightening the spark plug. The plug only needs to be "snug".
I've never used a torque wrench to tighten spark plugs since you can easily over tighten them. But if you insist on using a torque wrench, the service manual specification is 13 lb-ft (or 18 Northward-thousand).
Double check that the spark plug is tight before moving on to the adjacent steps.
Apply Dielectric Grease

Lower In Ignition Coil
Rotate - Spread Grease
Apply a minor amount of dielectric grease to the opening in the dust kick.
The dielectric grease will help go along out any debris, dust or wet to ensure a reliable electrical connection.
Lower the ignition coil into the well and push it down on to the top of the new spark plug.
Rotate the ignition coil back and forth a few times to help spread the dielectric grease.

Spin In Bolt
Tighten Clockwise

Push On Power Plug
Spin in the bolt a few turns by mitt in the clockwise direction to help preclude information technology from condign cross threaded.
Tighten the bolt in the clockwise direction with the 10mm socket and a 1/four" drive ratchet until it is snug.
Endeavor to avoid over tightening the commodities to forbid from cracking the plastic ignition scroll assembly.
Push the electrical connector directly on to the base of the ignition ringlet.
Yous should feel or hear the power plug "click" securely into place.
Spark Plugs Replaced
Lower Engine Cover
Tighten Clockwise
Lower the plastic cover over the top of the engine.
(Please note, the i.5L turbo engine does non take a plastic cover like the 2.0L I4 shown on this folio.)

Supersede Third Bolt
Tighten Fourth Commodities
Plastic Cover Secured
Avoid over tightening the bolts to prevent from cracking the plastic cover.
Starting time the engine and heed closely for any strange sounds or other noises that might indicate a trouble such as a loose spark plug, faulty ignition coil or a disconnected electrical connector.
Be sure to write down the plug change in your vehicle's service records.
Please check out all of my 2016-2019 Honda Borough DIY Repair & Maintenance Guides.
Source: https://www.paulstravelpictures.com/2016-2019-Honda-Civic-Spark-Plugs-Replacement-Guide/
Posted by: martinhignisfat.blogspot.com
0 Response to "How To Change Spark Plugs On 2013 Honda Civic Si"
Post a Comment